

Description
The ZO-600 is designed for Laboratory use, or where a larger amount of the solution is needed to run probe calibrations in the field. Where field calibrations are required, the ZO-150 bottles are more suited and can be used with the probes inserted directly into the bottle of the DO Zero calibration solution.
Calibrating the Galvanic Electrode
The Galvanic DO electrode should be calibrated at the Zero saturation point at least once a month. Before each day’s use, the 100% saturation point should be checked in moist air and re- calibrated, if necessary. For optimum accuracy, calibrate the DO100% point as near to your sample temperature as possible (within the calibration temperature limits of 5 – 40°C).
If you are going to calibrate both the Zero and 100% points at the same time, ALWAYS calibrate the Zero point first, then the 100% point.
Calibrating the DO Zero Point
- Remove the lid from the ZO-600 bottle, remove the storage cap from the pH electrode if fitted, wash the Probe in distilled water.
- Pour half of the DO Zero calibration solution into a calibration cup and then drop the Probe in all the way.
- Air bubbles can be dislodge from the probe by gently knocking it against the bottom of the cup.
- Switch the Aquameter/BlueLink on and wait until the DO reading is completely stable.
- Ensure the temperature of the solution is between 5 and 40°C (41 – 104F).
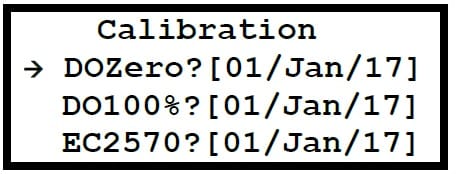
- Press the MENU key then select Calibration and then Full Cal and DO/EC.
- Select DO Zero and wait until the readings stablise.
- Once the screen shows 100% Calibration, the value shown is the mV value from the DO Cell.
- Remove the Probe from the calibration bottle, rinse thoroughly in fresh water, shake off any excess and dry the outer sleeve with a soft cloth.
Calibrating the DO 100% Saturation Point in Moist Air
- Wash the probe thoroughly in fresh water, then shake off ensuring there are no droplets adhering to the DO membrane.
- Moisten a clean cloth or piece of tissue paper with fresh water and wrap it around the open end of the probe ensuring all the holes are covered. Place the probe on a flat surface. Do not hold the probe, the heat from your hands will warm the probe up and interfere with calibration.
- Switch the Aquameter/BlueLink on and wait until the temperature measurement is completely stable. This is very important.
- Referring back item 4 above, then select DO100% and wait until readings stablise.
- Wait while the calibration procedure is carried out and the Calibration Report is displayed.
- Check the mV value is over 20.0. Readings below 20.0 mean the CO cap should be replaced.
Calibrating the Optical DO Electrode
The Optical DO electrode should be calibrated at the Zero saturation point at least once a month. Before each day’s use, the 100% saturation point should be checked in moist air and re- calibrated, if necessary. For optimum accuracy, calibrate the DO100% point as near to your sample temperature as possible (within the calibration temperature limits of 5 – 40°C).
If you are going to calibrate both the Zero and 100% points at the same time, ALWAYS calibrate the Zero point first, then the 100% point.
Calibrating the DO Zero Point
- Remove the lid from a 150mL bottle of DO Zero calibration solution, remove the storage cap from the pH electrode if fitted, wash the Probe in distilled water, then drop the Probe in all the way.
- Switch the Aquameter/BlueLink on and wait until the DO reading is completely stable.
- Ensure the temperature of the solution is between 5 and 40°C (41 – 104F).
- Press the MENU key then select Calibration and then Full Cal and DO/EC.
- Select DO Zero and wait until the readings stablise.
- Once the screen shows 100% Calibration, the value shown is the value from the Luminiphore and this value should be between 3.5 and 4.7 (@ 25°C)
- If the value is below 3.5, the optical DO cap should be replaced.
- Remove the Probe from the calibration bottle, rinse thoroughly in fresh water, shake off any excess and dry the outer sleeve with a soft cloth.
Calibrating the DO 100% Saturation Point in Moist Air
- Wash the probe thoroughly in fresh water, then shake off ensuring there are no droplets adhering to the DO membrane.
- Moisten a clean cloth or piece of tissue paper with fresh water and wrap it around the open end of the probe ensuring all the holes are covered. Place the probe on a flat surface. Do not hold the probe, the heat from your hands will warm the probe up and interfere with calibration.
- Switch the Aquameter/BlueLink on and wait until the temperature measurement is completely stable. This is very important.
- Referring back item 4 above, then select DO100% and wait until readings stablise.
- Wait while the calibration procedure is carried out and the Calibration Report is displayed.
- Check the Luminophore value should be between 0.8 and 1.5 (@ 25°C).
- If the value is below 0.8, the optical DO cap should be replaced.