


Description
Top Tips for successful measurements using optical electrodes
- Use a non-fluorescent container for calibration solutions. Some plastics may fluoresce and interfere with calibration.
- Avoid strong artificial lighting during calibration. The alternating nature of artificial lights (especially fluorescent tubes) can interfere with calibration.
- Use a reasonably deep container for calibration in order to ensure a fast temperature response. The calibration solution should preferably be up to the blue line on the Probe.
- Always keep the measurement chamber and electrode lenses clean.
- Always fit the sleeve and end cap during both calibration and measurement.
- Always allow the readings to settle completely during both calibration and measurement.
- Always try to eliminate air bubbles by agitating the Probe after insertion both during calibration and measurement.
- Always calibrate and zero the electrode as close to your sample temperature as possible.
- Always zero the electrode just prior to use in clean water (bottled still mineral water is ideal).
Calibrating the Electrode
The 20% WT Rhodamine Dye can be used to calibrate the Rhodamine, Chlorophyll, BGA-PE and BGA-PC probes. Dilution will be require for Chlorophyll and both Blue Green Algae Electrodes.
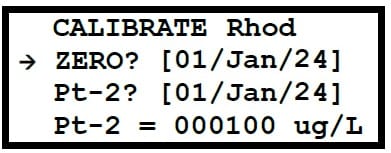
Rhodamine – A dilution of 100µg/L needs to be prepared by serial dilution of the 20% Rhodamine Dye solution.
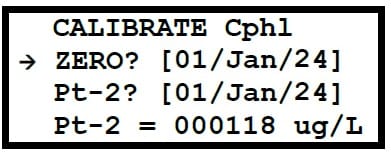
Chlorophyll – A dilution of 500µg/L needs to be prepared by serial dilution of the 20% Rhodamine Dye solution.
Fresh Water Blue Green Algae (BGA-PC) – A dilution of 100µg/L needs to be prepared by serial dilution of the 20% Rhodamine Dye solution.
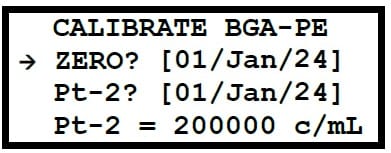
Marine Water Blue Green Algae (BGA-PE) – A dilution of 8µg/L needs to be prepared by serial dilution of the 20% Rhodamine Dye solution.
Serial Dilutions
The recommended Rhodamine solution is supplied as a 20% or 200g/L solution, dilution of the stock solution should be carried out as follows.
200g/L stock → 500μg/L is recommended to be done as a two step dilution procedure for Chlorophyll Electrodes.
200g/L stock → 100μg/L is recommended to be done as a two step dilution procedure for Rhodamine and BGA-PC Electrodes.
200g/L stock → 8µg/L is recommended to be done as a two step dilution procedure for BGA-PE Electrodes.
Step 1: weigh out 0.5g of 200g/L stock solution in a weigh boat and add this to 1L of deionised water in a volumetric flask, use some of the water from the 1L flask to rinse the weigh boat so no stock Rhodamine remains on the boat. Put a lid on the 1L flask and invert 10 times. This step results in a 1 in 2000 dilution of the stock, at this point the 1L flask will contain a 100mg/L solution. This solution can then be used to prepare the dilution for Step 2 for the four different probes.
Step 2-1: Transfer 5ml of the 100mg/L solution to a 1L volumetric flask and top up to 1L with deionised water. Put a lid on the 1L flask and invert 10 times.
This step results in a 1 in 200 dilution of the solution from step 1. The concentration of this solution is 500μg/L. This solution can now be used as Pt-2 calibration of the CPHYLL sensor.
Step 2-2: Transfer 1ml of the 100mg/L solution to a 1L volumetric flask and top up to 1L with deionised water. Put a lid on the 1L flask and invert 10 times.
This step results in a 1 in 1,000 dilution of the solution from step 1. The concentration of this solution is 100μg/L. This solution can now be used as Pt-2 calibration of the RHOD and BGA-PC sensor.
Step 2-3: Transfer 80µl of the 100mg/L solution to a 1L volumetric flask and top up to 1L with deionised water. Put a lid on the 1L flask and invert 10 times.
This step results in a 1 in 12,500 dilution of the solution from step 1. The concentration of this solution is 100μg/L. This solution can now be used as Pt-2 calibration of the BGA-PE sensor.
Dilute solutions can be stored in a dark bottle in a refrigerator for up to five days. After that time it must be discarded. Solution should be allowed to return to 20°C for calibration process.
Zero Point Calibration
This calibration should be carried out before each day’s use.
- Step 1: Prepare Calibration Bottle. Fill a calibration bottle with clean water (bottled still mineral water is recommended). Never use sparkling or carbonated water.
- Step 2: Insert Probe. Wash the Probe in clean water, then insert it all the way into the calibration bottle. Ensure the Sleeve End Cap is fitted. Gently agitate the Probe several times to remove any clinging air bubbles.
- Step 3: Power On and Stabilise. Switch the Aquameter, or BlueLink Device, on and wait until the temperature and solutions readings are stable. If readings are high, re-agitate the Probe to remove any air bubbles.
- Step 4: Navigate to Calibration Menu. Press the MENU key, then select “Calibration”. The screen will display calibration options including “ZERO?” and “Pt-2”.
- Step 5: Select Zero Calibration. Select “ZERO”. The Meter will display “PLEASE WAIT Stabilising” and a progress counter.
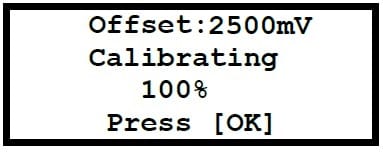
- Step 6: Complete Calibration. Once the calibration is successful, the counter will reach 100%, and “Calibrating 100% Press [OK]” will be displayed, along with the voltage output in mV. This value is not stored in the memory, so a manual record should be made for future reference. Press OK to continue.
- Step 7: Verify Zero Calibration. After calibrating, remove the Probe from the bottle, reinsert it, agitate, and allow the reading to settle.
Calibrating the High Point (Pt-2)
The probe should be removed from the zero solution and dry outer sleeve with a soft cloth.
- Step 1: Prepare Calibration Solution. Prepare the solution as direct above for the relevant probe and pour 300ml in to a clean calibration cup. Gently lower the Probe into the solution all the way. Agitate the Probe several times to remove air bubbles.
- Step 2: Access Calibration Menu. Press the MENU key, then select “Calibration”.
- Step 3: Select Calibration. Select “Pt-2”. The screen will display “PLEASE WAIT Stabilising” and a progress counter. The Meter will wait for stability, then calibrate.
- Step 4: Complete Calibration. After successful calibration, the “Calibrating 100% Press [OK]” screen will appear with the voltage output in mV. This value is not stored in the memory, so a manual record should be made. Press OK to continue.
Any significant difference in the mV values to previous readings could highlight an issue with the electrode. This may just be a dirty lens, incorrectly prepared solution, change in temperature, air bubbles or changes in the measurement chamber. Repeating the calibration after the probe has been cleaned, may resolve any issues.